Minecraft Bedrock Edition How to Change Texture Packs
Note: The resulting texture pack will still work, but a newer tutorial from NVIDIA with ray tracing support is available, and the resulting texture pack following NVIDIA will also support devices incapable of ray tracing. But, if you're a beginner, start here first, explore and learn, then go to ray tracing.
Contents
- 1 Summary
- 1.1 Time Required
- 1.2 Required Tools
- 1.2.1 A text editor
- 1.2.2 An image editing program
- 2 Getting Started
- 3 Creating a resource pack
- 3.1 A quick note about UUIDs
- 3.2 Creating a JSON file
- 3.2.1 Note
- 3.3 manifest.json
- 3.3.1 Note
- 3.4 Testing our Pack
- 3.4.1 Troubleshooting
- 3.5 Creating an Icon
- 3.6 Modifying an Entity's texture
- 3.6.1 A quick note on textures
- 3.6.2 Note
- 3.7 A note on texture file formats
- 3.8 Testing our Resource Pack
- 3.8.1 Results
- 3.8.2 Challenge 1
- 3.9 Block Textures
- 3.9.1 Challenge 2
- 3.10 Item Textures – Challenge 3
- 3.11 Environment Textures
- 3.12 Troubleshooting textures
- 4 Congratulations!
- 5 Exporting and Sharing
- 6 The Deeper Understanding
- 6.1 Note
This tutorial is intended for beginners! If you are looking for specific component details, check the Entity Component Reference Guide. The topics that this tutorial will cover are:
- How to create a Resource pack
- How to change textures for:
- Entities
- Blocks
- Items
Time Required
This tutorial should take around 1.5 to 2 hours to complete, if you are new to the concept.
Required Tools
You will need the following programs to follow along with this tutorial:
A text editor
Any text editor should work, but using some sort of programming IDE is recommended. Visual Studio Code is an excellent choice, and is a free text editor with syntax highlighting for lots of programming languages. You can download Visual Studio Code from here. Atom is also recommended, which you can download here.
ES File Explorer can be used on mobile devices, you can get it here. iOS devices can use the pre-installed Files app, or if your iOS is jailbroken, you can also use iFile. Android devices can also use MT Manager.
An image editing program
Microsoft Paint will work for modifying most textures, but will not work for saving out textures that have transparency (like most entities). GIMP (GNU Image Manipulation Program) is a free image editing program that will allow you to save out transparent images. You can download GIMP from here. You can also use Paint 3D, as it allows for transparency.
Paint.net also supports transparency and has a more simple and basic UI, get it here
Blockbench makes it easier to change models and textures, and you can use the entity wizard plugin to add an entity in a couple of clicks.
We are going to start off small and teach you how to make a resource pack. Resource packs are add-ons that can modify textures, models, animations, music, sounds, user interfaces, and languages. This tutorial will be focusing specifically on modifying textures.
Start off by navigating to your resource_packs folder. Your file path should look something like this:
Windows 10:
%localappdata%\Packages\Microsoft.MinecraftUWP_8wekyb3d8bbwe\LocalState\games\com.mojang\resource_packs
Android:
/storage/emulated/0/games/com.mojang/resource_packs
iOS:
/files/on my iphone/minecraft/games/com.mojang/resource_packs
Once you are in the resource pack folder, create a new folder and name it: "Tutorial_Resource_Pack". Then, open that folder.
The first thing we need to do is create a manifest.json file. This file is going to contain data about our resource pack such as the name of our pack, the description of our resource pack that shows up in game, and a universally unique identifier (UUID).
A quick note about UUIDs
A UUID is an identifier that we will use to differentiate between our various add-ons. For this reason, UUIDs must be unique! If you don't change the UUID from pack to pack, your pack may not show up in game! But UUIDs are easy to generate! An online generator can be found here. Refresh the page when you need a new one.
Creating a JSON file
To create a JSON file, right click in the 'Tutorial_Resource_Pack' folder and create a new text document. Name this file manifest.json.
Note
Make sure the file extension is .json and not .txt when you rename it. You may be warned that changing a file name extension could make the file unusable. This is okay!
If you can't see file extensions, you can turn them on by going to the View menu of the file explorer and checking the check box for file name extensions.

manifest.json
Open manifest.json in a text editor of your choice and copy or type the following:
- manifest.json
{ "format_version": 2, "header": { "description": "Tutorial Resource Pack", "name": "Tutorial Resource Pack", "uuid": "d32876c8-fbac-40c2-b040-8bf4c18a9b7e", "version": [1, 0, 0], "min_engine_version": [1, 17, 30] }, "modules": [ { "description": "Tutorial Resource Pack", "type": "resources", "uuid": "c476b91e-e003-40cd-a7d4-2d8c1c3ff914", "version": [1, 0, 0] } ] } Alternatively, you can copy the included file called "manifest.json" into your Tutorial_Resource_Pack folder and rename it to "manifest.json".
Make sure that the two uuid's in the modules section are two different UUIDs, as mentioned above, you can generate UUIDs online here. The name and first description field can be filled in with whatever text you'd like to display in game. Make sure to use a Version 1 UUID in your manifest.
The second part named "modules" tells the game what kind of pack it is. Because you are making a resource pack, leave the type to "resources". Note that the descriptions in any modules are not required, and are not seen in game.
Note
This file is in the JSON data format! We won't go into specifics about the format now, but be aware about how things are laid out. Be very careful not to forget quotation marks, colons, and curly or square brackets. Missing one of these can lead to your resource pack not working correctly! You can use JSONlint to troubleshoot your files. If you are using visual studio code, it can debug the files without using JSONlint. Note that comments are permitted in the files, even if the website/visual studio code says that comments aren't allowed.[1]
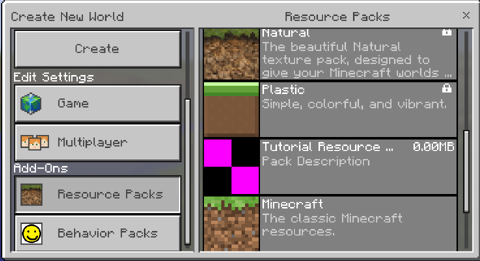
Testing our Pack
Now we are ready to test it out in-game! Launch Minecraft and create a new world. On the left side of the screen scroll down and click on Resource Packs. On the right side of the screen scroll until you see "Tutorial Resource Pack". Your game should look something like this if you used the above code:
Troubleshooting
{ "format_version": 2 "header": { "description": "Tutorial Resource Pack", "name": "Tutorial Resource Pack", "uuid": "d32876c8-fbac-40c2-b040-8bf4c18a9b7e", "version": [1, 0, 0], "min_engine_version": [1, 17, 30] }, "modules": [ { "type": "resources", "uuid": "c476b91e-e003-40cd-a7d4-2d8c1c3ff914", "version": [1, 0, 0] } ] } Kurd
If you don't see your pack in-game, make sure your manifest.json is correct. Look for any missing curly braces { }, commas, colons :, quotation marks " ", or square brackets [ ]. Remember for each open brace, quotation, or square bracket, you must have a closing brace, quotation, or square bracket. You can also use a JSON validator like JSONLint to validate (and correct) your JSON-file. Using visual studio code will tell you any errors.
Creating an Icon
As you may have noticed, our pack does not have an icon. If you do not specify an icon, a missing texture block will show up next to your pack.
In the image editor of your choice, create a new image with a maximum size of 256x256 pixels. Note that the number should be a power of 2.
Do this with MS Paint or Paint 3D:
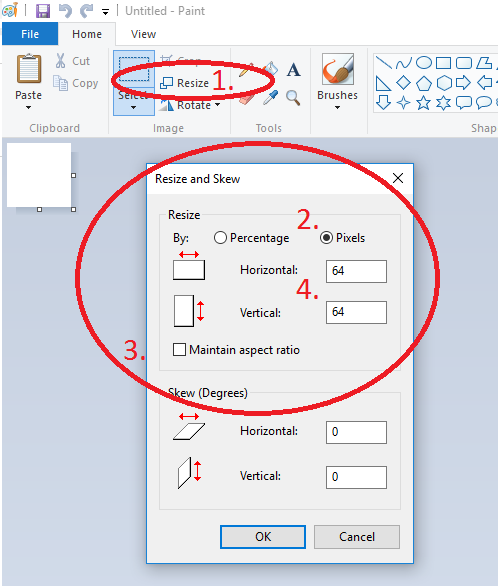
- Click resize
- Change from percentage to pixels in the resize dialog that pops up
- Uncheck maintain aspect ratio
- Type in a number that is 256 or smaller in both horizontal and vertical text entry boxes
- Click OK
Once you have the correct canvas size, draw whatever you want your icon to be. For this tutorial, we've created a smiley face:

Save your icon with the name "pack_icon" and make sure that it is saved as a .png file. Save it into the same folder that we put our manifest.json file. For reference, our folder should look like this now:
Note: The image is slightly outdated, rename pack_manifest.json to manifest.json. Now if we launch the game and go to the resource packs section in "create world" it should look something like this:
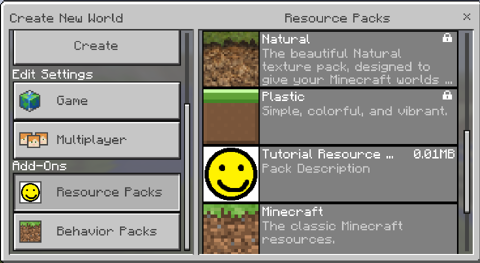
Click on the tutorial resource pack to add it to the world you are making!
Modifying an Entity's texture
Now that we have our resource pack set up, let's modify the creeper's texture!
However, before we can do some painting, we need to set up the folder structure that Minecraft expects resource packs to be in. To do this, do the following:
- Create a folder named "textures" in our Tutorial_resource_pack folder
- Inside "textures", create a folder called "entity"
- Inside "entity", create a folder called "creeper"
- Copy the creeper texture from the Vanilla Minecraft resource pack into our newly created creeper folder. After downloading the example pack, the texture can be found on this file path: \Vanilla_Resource_Pack\textures\entity\creeper
Your folder should now look like:

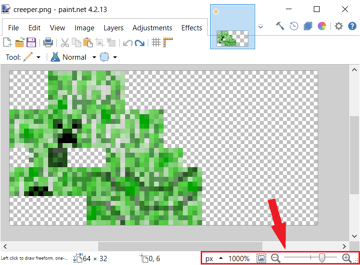
Now that we have the normal creeper texture, open it up in the image editor of your choice. It should look something like this:
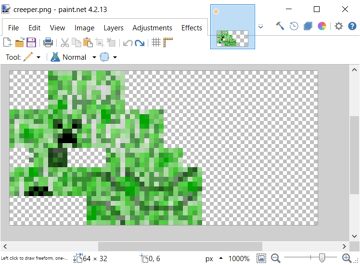
You might notice your texture looking small, make sure to zoom in on the texture. In MS Paint you can control magnification in the bottom right-hand corner of the window with the slider.
A quick note on textures
If you've never seen a texture before, the above image might surprise you. The best way to think about it is like wrapping a gift with wrapping paper, but instead, our wrapping paper is our texture. Here is how the creeper's texture is laid out:
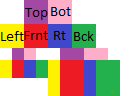
| Image Key | |
|---|---|
| Top | Top of cube |
| Bot | Bottom of cube |
| Left | Left side |
| Frnt | Front side |
| Rt | Right side |
| Bck | Back side |
Areas with matching colors face the same direction (i.e. Red areas are always the front of a cube).
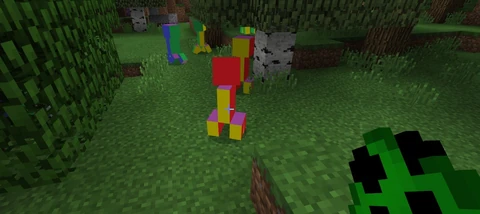
How this looks in game:
Note
Not every texture is laid out in the same way, you will need to experiment and find out how each entity's texture is laid out. Advanced users can look at the mobs.json file in the model folder to find where the textures' UVs are for each body part.
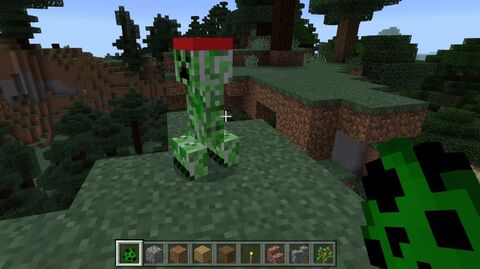
Now it's time to be creative! Edit the creeper however you want. We are just going to add a headband for the sake of simplicity.
Once you are happy with your texture, save out the file as a .png and make sure that the file name is "creeper". The game will only look for files with the correct name. When in doubt, check the Vanilla Minecraft Resource Pack to see file names.
A note on texture file formats
Minecraft supports .tgas, .pngs and .jpgs. However, it will first try to load the TGA version, then the png, then the jpg. This means if you have 2 creeper textures, one as a png, and one as a TGA, the game will see the TGA one first and load that as your creeper's texture.
Testing our Resource Pack
- Launch the game
- Create a new world
- Set world to creative
- Click on Resource Packs
- Find "Tutorial Resource Pack" in the list on the right and click it
- Click Play
- Spawn a creeper using the creeper egg from the creative inventory
Results
Challenge 1
Using what you know now, create a new texture for pigs and for chickens.
- HINTS
- Chickens don't have a folder for their textures like creepers, their texture just goes in the textures/entity folder.
- Chickens have transparency, so remember to use an image editing program that can save transparency
Block Textures
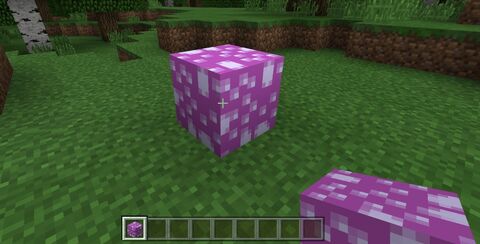
Now that we've gone through the process for an entity, changing textures for a block should seem straightforward. Let's create a new texture for our stone block.
To create a new stone texture:
- In your textures folder create a new folder called "blocks".
- Copy the stone texture from the Vanilla Minecraft Resource Pack into our new blocks folder
- It can be found here: /Vanilla_Resource_Pack/textures/blocks/stone.png
- Open stone texture in an image editing software and make edits
- Test in-game
Here is our new stone texture: ![]()
and how it looks in game:
Challenge 2
Congratulations! Now that you can create your own block textures, try making a new texture for the furnace.
HINT: furnaces use different textures for the front, side, top, and front when turned on, make sure to edit all of them.
Item Textures – Challenge 3
Creating a new item texture is like making a new block texture. Follow the same steps as above but make sure to make a folder called "items" in your textures folder and place your item textures there. Remember, you can always look at the Vanilla Minecraft resource pack as an example (/Vanilla_Resource_Pack/textures/items).
Environment Textures
You can also change the textures for clouds, the moon, the rain, the snow, the sun, and the cracking animation that plays when you break blocks. These textures should be put into a folder called "environment" in the textures folder.
Troubleshooting textures
If your texture is not showing up in-game, check the following things:
- Make sure it has the same name as the asset you are trying to replace
- Example: Creeper texture should be called "creeper", the stone texture is called "stone"
- Make sure the texture is in the correct folder!
- Ensure that all image files are in the right format (.png, .tga, or .jpg) or they will not load.
- Ensure that the image files have been saved as the right extension, e.g. don't just change the extension. If using GIMP, use the "Export As" function (under "File").
You've completed this tutorial and should now know how to create your own resource pack add-ons!
Now that you've created a resource pack, you probably want to share it with others! To do this, perform the following:
- Navigate into your
development_resource_packsfolder
-
-
C:\Users\Username\AppData\Local\Packages\Microsoft.MinecraftUWP_8wekyb3d8bbwe\LocalState\games\com.mojang\development_resource_packs\tutorial_resource_pack
-
- Select all of the files and folders
- Right click on the highlighted files and select Send to -> Compressed (zipped) folder
- Name the file
tutorial_resource_pack.mcpack- Make sure to change the file extension to
.mcpack- When the popup asks you if you are sure you want to change the file extension, click Yes.
- Make sure to change the file extension to
You can now give others that file! When they open it, Minecraft will launch if it isn't running yet, and then it will import your resource pack for them to use!
Soon, with practice, you'll be able to make resource packs and upload them to various sites. Link to Vanilla Textures Pack (1.8) {Go deeper down until you see Download the zips for the Resource Pack} Tips:
- To rename something, go into the Text file, and find en_us (for English), it is separated into stuff like items and tiles to achievements or warnings
- Some mob textures are TGAs, You can get a converter such as Pixillion.
- Some other textures (Such as the Sea Lantern,) are animated and are separated into 4 frames vertically.
- If some textures like zombified piglin are complicated, try imagining it as a papercraft, or a net, but some parts are in the wrong place (e.g. Top, bottom next to each other)
Note
You can test to see if your exported resource pack works by deleting your copy in your development_resource_packs folder (make a backup first!), then opening your mcpack to import it. If it doesn't work, make sure you selected the contents of your resource pack and not the folder itself when making the .mcpack to .zip.
Minecraft Bedrock Edition How to Change Texture Packs
Source: https://minecraft.fandom.com/wiki/Tutorials/Creating_resource_pack_add-ons
0 Response to "Minecraft Bedrock Edition How to Change Texture Packs"
Post a Comment